Antifouling is simply an underwater hull paint applied to the outboard layer of a boat. Its purpose is to slow down the growth of subaquatic organisms which, over time, attach themselves to the hull. This has a detrimental effect on both the durability and the performance of the craft. The thickness of paint on your boat’s hull will build up over a few years necessitating it be stripped back to the bare hull. It is recommended to do this every four or five years.
Antifouling is one of the most dreaded maintenance tasks faced by a yachtsman. It can seem a daunting prospect and the range of antifoul products on the market can be overwhelming. However, don’t be put off, as the more antifouling coats there are on the hull the easier it is to strip back and remove.
In this guide, we’ll walk you through the basic stages of antifouling your hull but first…
Types of Antifoul
There are three basic types of antifouling available, hard, eroding and copper.
Hard Antifoul
This is the basic and original type of antifouling. When wet it is hard enough to withstand wipe downs with a sponge or soft cloth without any substantial paint removal. Although abrasive in the water, hard antifoul does not wear away to any great degree. However, after a few seasons you are eventually faced with the prospect of stripping back the build-up of the hard antifoul as it becomes structurally unsound after multiple applications. Hard antifoul is ideal for high performance craft that are used frequently. Fresh water moored boats are also suitable for this type of antifoul.
Eroding Antifoul
As the name suggests, eroding antifoul wears away until you are left with no protection on your hull. In theory, if there is antifoul on your hull it’s protected. However, this does not happen with the new generation of paints because as the paint film thins, the biocides are washed out leaving effectively a bare surface. The paint works by using the water’s friction to remove the thickness of the paint thus exposing fresh layers of biocide.
Copper-based
These use copper particles suspended in an epoxy coating. Long lasting, up to 10 years, but the most expensive of the three.
Each boat manufacturer will recommend which antifouling paint is suitable for each type of boat.
Does my boat need antifouling?
The first thing to do is to examine your hull closely. Any eroding antifoul should have removed most of itself from the hull.
Look for signs of the following:
-
Craters
The hull should be of a smooth appearance and not resemble the moon’s surface.
-
Flaking
Paint that has peeled off and left rough edges.
-
Blisters
Where water has become trapped between the paint and the hull.
If your hull shows any of these signs then it’s probably time to antifoul.
Applying antifouling safely
There’s no getting around the fact that antifouling is a dirty job. It’s also extremely hazardous if you don’t take health and safety seriously. Full protective clothing, including an effective face mask and goggles, are essential. Antifouling dust is poisonous and a simple decorator’s mask will not suffice. Wear safety equipment throughout the antifouling process.
Step-by-step guide to antifoul a boat?
Step 1. Preparing the hull for antifouling
As soon as your boat is ashore the hull should be pressure washed to remove any existing fouling. It is often advisable to use a degreaser at this point. Any areas of flaking or loose paint can be scraped off. If many layers have built up and/or there are any large areas where it has adhered poorly, it is best to strip the hull right back to a sound surface.
There are three basic methods of preparing the hull for antifouling;
-
DIY scraping
The cheapest method but very labour intensive. Ensure the scraping blades used are sharp and round off any corners with a file to avoid digging into the hull.
-
Chemical stripping
Quicker than scraping but ensure you are using the correct products for use on GRP. A non-compliant paint stripper will cause damage to the hull. You may need several applications depending on the thickness of paint being removed. Chemical strippers can get messy.
-
DIY soda blasting
The least labour intensive but most expensive method. Many sailors prefer to leave this to the professionals but it can be carried out by the competent DIYer. It is possible to buy soda “pots” and hire a suitable compressor and do your own blasting.
The first task is to mark out where the waterline is on your hull. Make a mark with a chinagraph pencil whilst the craft is still afloat. In some cases, there will be a waterline stain on the hull to indicate the waterline. Make a mark a couple of inches higher than the waterline mark to allow for a loaded boat and a full fuel tank. Make several marks along the hull and draw a line connecting them up with a straight edge. Using good quality masking tape, mark the line along the entire length of the hull.
Next, you need to key the surface to enable the paint to adhere to the hull. Use a coarse grade of wet/dry sandpaper, 40-60 grit, and plenty of warm water and sand the entire area you are painting. As soon as the sandpaper loses bite, rinse or replace it. To save time, use an electric sander for larger areas.
If you are sanding the surface right back to a bare hull then you will need to prime the surface.
Step2. Priming
Priming ensures that the antifoul adheres properly to the hull. Ensure the primer you are intending to use is compatible with your chosen antifoul. It’s worth thinning the primer down by around 10% as it makes it go on a little easier and will cure faster. Use a medium-sized paint roller and gently apply the primer paint to the prepared hull. Paint right up to your masking taped line taking care not to paint above it. Leave the paint to cure completely as per the manufacturer’s guidelines.
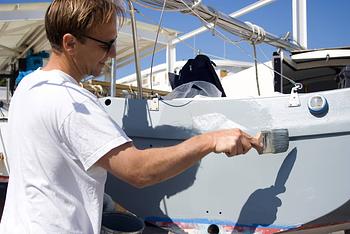
Step 3. Applying the antifouling paint
Apply the antifouling paint once the primer has dried thoroughly. Apply the paint lightly and evenly. Pay particular attention to areas you would expect to have greater wear such as leading edges, keel, etc. These areas may require an extra coat of paint. Sunlit areas of the hull will attract more marine growth than darker areas underneath and may also require an extra coat. In general, two coats of antifoul are to be recommended. Don’t attempt to try and stretch the paint out as the more biocide you have on the hull the better the protection achieved. Keep stirring your paint throughout the process as up to 50% of the antifoul is solid content and will settle to the bottom of the can when left.
A medium pile paint roller with an extension handle is the easiest way of applying the paint. Keep any zinc sacrificial hull or shaft anodes clear of any paint as this could damage their performance. Ideally, you want to be painting in the late morning or early afternoon on a dry day. If the air temperature is cooler then keep your tin of paint in a warm place to ensure it flows smoothly. Don’t be tempted to mix batches of paint. Apply the paint logically so you can see where you’ve painted and where you haven’t. One method is to mark the area at one-foot intervals with chalk, which you can paint over and will always know where you’ve got to. If your boat is supported on cradle pads, just paint up to them and once dry, ask the boatyard to move them onto a painted area and treat accordingly. Another option is to paint these areas whilst the boat is still in the lifting slings.
Tips for painting
- - Remove the masking tape as soon as the paint has turned tacky.
- - Don’t be too vigorous with your brush strokes, it may disturb the primer.
- - Use a rag and thinners to remove any splashes or drips.
No antifouling will keep your boat 100% slime free but the good news is, the more you use your boat the better the antifoul will perform. Richard Jerram of International Paints explains, “Antifouling paint always works best when the boat is well used as they are developed to work when in motion". So, if you want a completely clean hull then choose the most appropriate antifouling and get out onto the water. Do you really need an excuse?
Related articles

Related Articles and Guides
29th Mar 2024
How to Transport Your Boat Four Different Ways
18th Oct 2023
How to Winterize a Boat: Steps, Checklist and Costs
20th Sep 2023
Painting a Fiberglass Boat: A Detailed Guide
19th Sep 2023


